
By Luke Menard
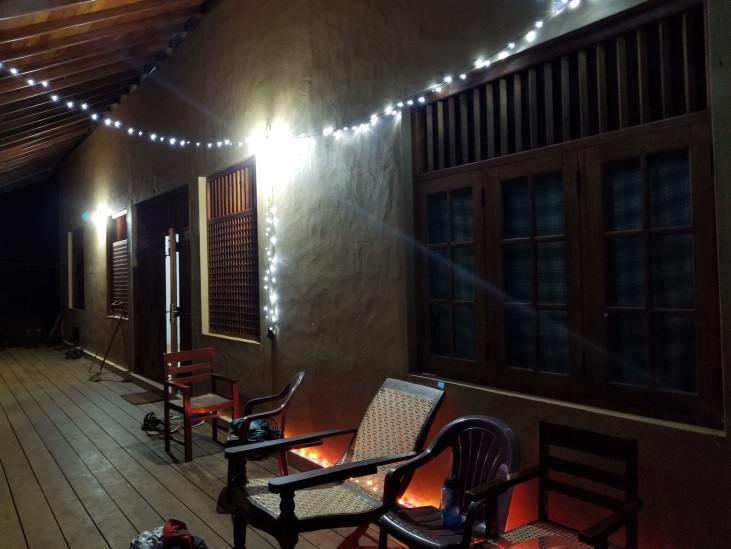
Since our arrival in Pitakele a month ago, life at the research station has been a flurry of activity — we’ve expanded our Sinhalese vocabulary, made some serious progress in the home garden, strategized and planned out the completion of our individual research tasks and projects, visited with several of our neighbors, and even squeezed in a few days of travel to other regions of Sri Lanka. Interspersed among our many days of hard work, of course, has been the occasional slow-paced, relaxing hour or two (don’t tell Dr. Ashton!). Nothing beats sipping a cold Lion lager under the new twinkling string lights we installed on the veranda, reading in a hammock with our caretaker’s dog lounging peacefully nearby, or catching up on some hoarded podcasts or Netflix episodes, downloaded whenever we come across a rare Wi-Fi connection in Kalawana (Fig. 1).

This two-part whopper of a blog post will serve as an update on some of the work we’ve accomplished and fun we’ve had thus far. Through these entries, Jo and I hope to both provide interested readers greater insight into what a normal series of days and tasks looks like for us, as well as to more explicitly document some of our procedures so that future fellows can easily follow along and complete these important projects on their own. If you fall into the former category of blog post peruser, feel free to either skim some of the minutiae detailed below or fully sink your teeth into what we like to refer to as the “varsity gardening” happening here in Pitakele!
Sinhala in Action
I’ll be honest – Sinhala is a tough language to learn. It’s spoken by the locals at a pace often incomprehensible to our unfamiliar ears, so picking up on the scattered words that we might recognize and distilling meaning from a string of sentences can be a challenge in the midst of a hasty conversation. The Sinhalese alphabet also uses a broader range of consonant sounds than does the Latin alphabet, so attempts at proper pronunciation regularly leave me feeling tongue-tied.
Thanks to the efforts of our new friend and language tutor, Suresh, however, we are rapidly improving in our abilities to piece together simple sentences and questions and more fully understand the answers we receive in return. Suresh spent much of our first two weeks with us, introducing us to new words (home garden-related and otherwise), drilling us on our sentence structure, and helping us translate many of the questions we plan to ask garden owners during our visits to their homes. With my discerning ear, Jo’s unparalleled ability to retain vocabulary and plant names, and Chandni’s pristine pronunciations, we may at this point be able to hold our own in a conversation with an entrepreneurial, home-garden-owning seven-year-old. If we come across such an individual, I promise to write a full blog post detailing our encounter.
With some urging from Suresh, we recently put our newfound language skills to the test. We visited with several neighbors as they returned to their homes from a day of work, and had the opportunity to introduce ourselves and chat about our interests and goals for the remainder of our time here. The welcome we received from the Pitakele community was remarkably warm. We were helped along by Suresh and our beaming neighbors whenever we struggled to remember that particular Sinhalese word escaping us, and we left feeling more confident in our ability to communicate and with fuller stomachs (the chats happened over warm tea and sweet biscuits).
We are so looking forward to meeting the rest of our neighbors throughout Pitakele and the nearby town of Kuduwa. From them, we hope to learn the intricacies of home garden maintenance, have detailed conversations about their families and livelihoods, gain greater insight into tea garden construction, and find a series of sites to study the interactions between birds and the plants that constitute their gardens. In a few weeks’ time, we should have mastered enough of the language to tackle these tasks head-on!
(You can read more about what learning Sinhala was like for last year’s fellows in Laura Luttrell’s Nov. 10, 2016 post, “Beginning a Nursery…and Learning a New Language.”)
A Sea of Weeds
It is unnerving how quickly wal peleya (weeds) seem to grow here (I use the Sinhalese form of the word to stress how critical its use has become in our burgeoning lexicon). A mere five months passed between the departure of the last cohort of fellows and our arrival, and already the beautifully manicured home garden documented in photographs and blog posts was largely unrecognizable, since covered with thick mats of fern, spreading vines, and tall weeds (Fig. 2). Our first task was obvious: remove the weeds throughout the home garden to prevent them from impeding the growth of our planted trees and flowers.


For the most part, this project was straightforward, yet time-consuming. We easily removed most of the weeds by hand or by hacking away with a pehiya, one of the long, hooked knives that we purchased from a local artisan in Kalawana. To prevent erosion on slopes, avoid extracting too much organic matter from our already nutrient-poor soils, and promote water retention, we then scattered the cut weeds throughout the garden. While not the most aesthetically-appealing practice, we feel confident that this is a good way to maintain and hopefully begin to improve the health of our soils.
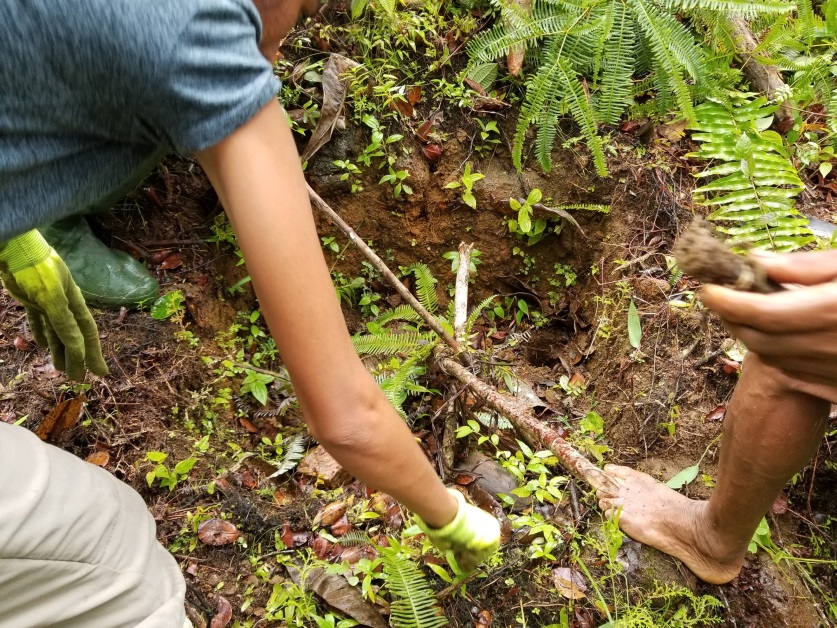
Probably the trickiest species of weedy plant that we’ve encountered is the kikela fern. The fern grows in huge swathes on our land, is often taller than your humble sameekshanyo (researchers), and consists of several distinct layers of plant matter, each of which must be dealt with in a unique manner if one hopes to reach the soil beneath (Fig. 3). For the sake of future fellows, I’ll try to outline what I’ve gleaned to be an appropriate method of removing this fern (although there really is no replacement for watching and learning from Tillakaratne, who truly is an expert at eradicating this pest).

On a slope, begin at the uppermost section of a patch of fern you wish to remove, chopping the base of the fresh fern stems and allowing the mass of green ferns to roll down the hill as you progress. This should reveal a layer of older, dry, dead fern. Using the point of the pehiya, scrape the mass of dead fern in lines parallel to the slope. By cutting the stems, you should then be able to easily remove this plant matter by hand. You will then be able to access the thick mat of roots immediately above the soil. Make two cuts to the root mat with the pehiya, a long cut parallel to the slope and a second perpendicular to it, making an L-shaped gash reaching the layer of soil. This should allow you to lift the corner of the root mat where the two cuts converge. While lifting the corner, scrape your pehiya along the top of the soil, severing the connection to the roots. Repeating this process should allow you to peel back the root mat in large sheets as you progress further downslope. The soil should now be exposed, but you’ll likely want to do a bit more hand weeding or raking to remove any remaining roots before you plant anything or collect soil from the cleared site.
Alternatively, we’ve been told that a controlled burn during the dry season is a great way to easily remove large swaths of fern at once.
In our first month, we were able to complete almost all of the weeding in Zones 1 (flowers, herbs, and medicinal plants) and 2 (fruit and nut trees, perennial crops) of our home garden. We’d like to cut a bit more of the fern shading some of the planted trees in Zone 3 (taller fruit and timber trees), where their presence is the most notable. All things considered, we’re well on our way to being largely weed-free (see Fig. 4) (at least for the next couple of months, at which point they’ll all have grown back, I suppose).

Figure 4. Before and after weeding of zones 1, 2 and 3.
Taking Stake (get it?!) of Our Home Garden
An important early-stage task critical to the completion of our long-term research goals and the documentation of the continued efforts of fellows has been the completion of a full inventory of the home garden. Having an up-to-date list of the trees and plants in every subzone of the garden will allow us to determine the mortality rates of individual species and spatially assess whether survivorship varies by zone and microenvironment. With this information, we should be able to determine where plants need to be replaced and prioritize the collection of those species that are either lacking in our inventory or will survive best in a particular environment.
I love maps. I’m an amateur cartographer and took all of the GIS, mapping, and remote sensing courses that F&ES had to offer. Getting the chance to explore the home garden using the incredibly detailed, hand-drawn maps that Logan, Laura, and Blair produced warmed my little georeferenced heart. Having a spatially-explicit account of all of the plants in each zone made the process of locating and identifying each individual far easier, so we are again thankful for their hard work.
To inventory each garden zone, we used the tag number and species information on the hand-written maps to find each individual plant. If the plant was present, but had no attached tag (either because the tag was lost or because no tag was assigned to it previously), we tagged the plant and took note of the given number. If the plant was absent, but a numbered tag was present, we assumed that the plant did not survive and marked it as dead. If both the plant and tag were absent, we did not provide a new tag and marked it as missing.
Using the maps as a reference, we then recorded species information for each plant. Additionally, we measured the height of each plant to the nearest half centimeter. When possible, we measured the height of the plant to the terminal bud (Fig. 5). If no terminal bud was present (e.g. pineapples, bananas, etc.), we measured the height both to the peak of the tallest leaf, frond, palm, etc., as well as to the point where the leaves, fronds, palms, etc. diverge. Finally, we took a photograph of each plant, labeled with the appropriate tag number.
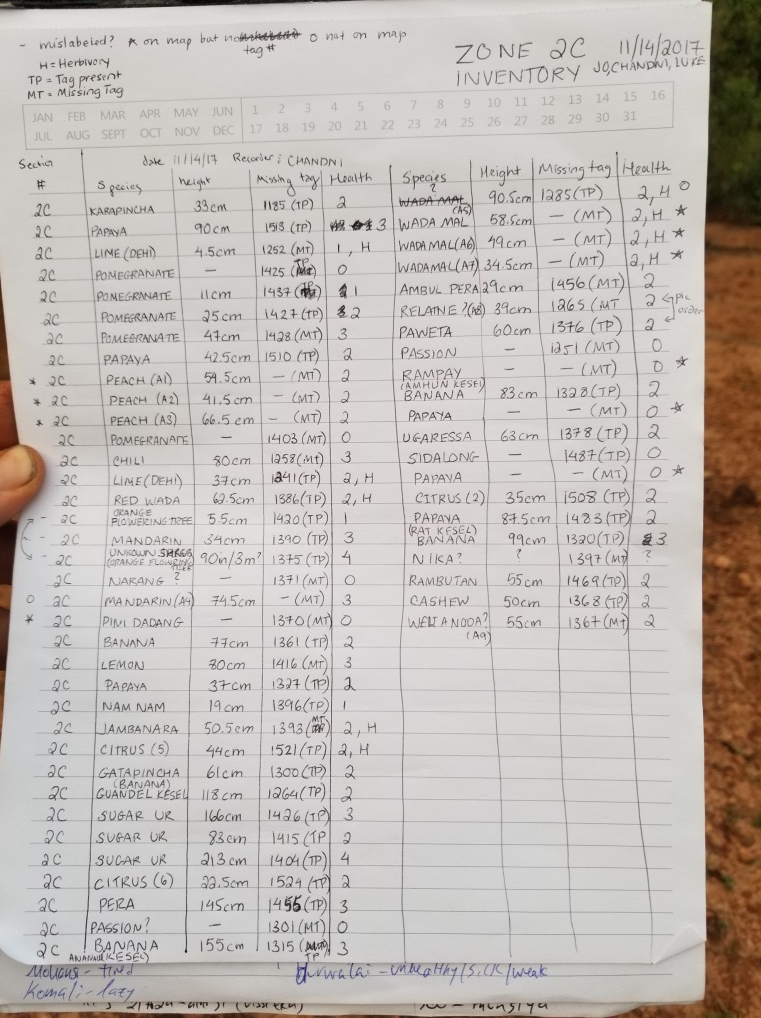
Figure 5. An example of an inventory sheet used to catalog the trees in Zone 2C
In the future, we hope to purchase a pair of calipers during a visit to Colombo. This will allow us to take diameter measurements at the root collar and/or breast height of each plant, which will add significant rigor to our dataset.
Another project that we hope to tackle soon is the creation of a digital, potentially interactive map of our home garden and research station. Using GPS software on our cellphones, we plan to create a series of georeferenced shapefiles that will include the boundary outlines of each management zone and a pin for each individual point in the garden. The final products will hopefully be an easy-to-use map that the next iteration of fellows can carry with them on their phones, as well as a clickable map for the folks reading this blog, through which you can get a visual image of each plant in the garden and track its growth over time. More to come on this as the project progresses!
Planting Pol (coconuts)
Sadly, not all of the plants and trees planted by last year’s crew survived the arduous four months before our arrival. R.I.P. This could have happened for any number of reasons. Some may have been outcompeted or shaded by weeds, others may not have received enough moisture from our home garden’s well-drained soil, and still others could have just toppled in a heavy wind gust (in fact, this happened to our tallest sugar cane during a strong storm just two days ago).
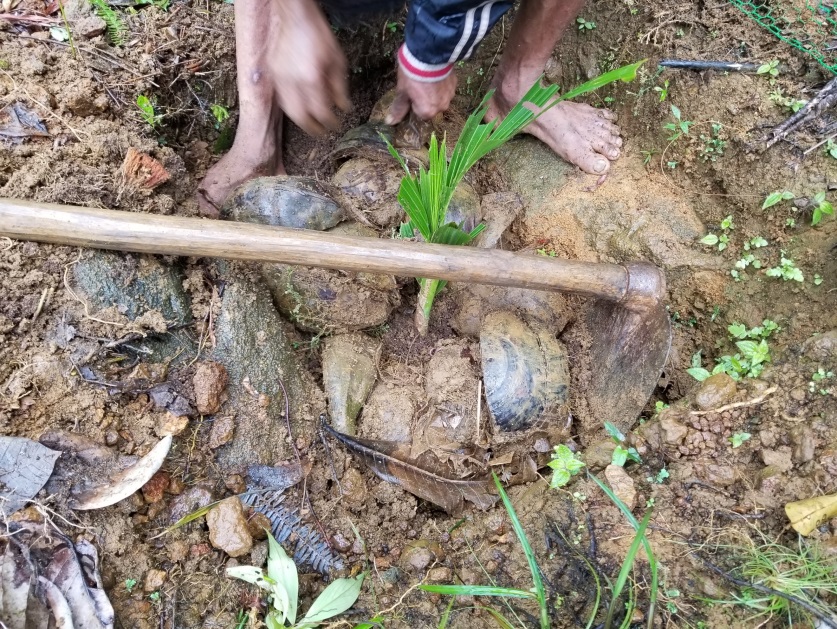
While touring Zone 3 with Tillakaratne, we came across a few Pol (coconut) saplings on the eastern edge of the garden that had perished. Since we had four extra healthy coconut saplings squirreled away from last year, we decided it would be a perfect opportunity to replace the dead trees with lively new ones. I know what you’re thinking: “Silly sameekshanyo, why would you plant the same species of tree in the exact same location and expect a different outcome? That’s the very definition of insanity!” Well, back off! We considered this point ourselves and, after some careful discussion with Tillakaratne, decided that by adjusting aspects of each newly planted tree’s microenvironment, we might be able to generate more favorable growing conditions for each plant. For most of the newly planted coconuts, this primarily entailed removing the surrounding fern and chopping some larger saplings to provide a wide berth of unshaded area for the trees to flourish. By also reinforcing the fence surrounding each tree to restrict access to fruit-hungry pests, applying Pol-specific fertilizer mixed with compost, and staying cognizant of our watering regime, we hope that we can grow big, beautiful Pol trees where there once was only death and destruction.
To transplant the new coconut saplings into the holes dug last season by Blair, we first temporarily removed the surrounding fencing and cleared the site of all noticeable weeds (Fig. 6). If present, we removed any remnants of the deceased pol, as well as any stones or coconut husks used in attempt to bolster and support its growth. We re-dug a portion of the original, very large hole, and inserted a new young coconut, still within its husk and shell. After replacing the removed soil and layers of surrounding husks and stones, we constructed a brace for the sapling using three small sticks and twine. Finally, we spread a mixture of compost, coconut-specific fertilizer, and salt in a wide circle around the new tree and secured the fencing back in its original position.


We returned to the site of each newly planted coconut a few days later to water each tree, add reinforcements to the fencing to further protect the tree from pests, and to clear a wider swath of surrounding fern and tall weeds in an effort to reduce resource competition. By repeating this process regularly, we hope that we can provide these replacement coconuts the conditions necessary to grow and thrive.
(For a detailed account of the labor-intensive coconut planting process, read Blair Rynearson’s April 24, 2017 post, “Planting a Coconut”)
Travel
On top of all the aforementioned hard work, we also squeezed in several days of travel to various cities across Sri Lanka. Jo and I visited hill country, taking a beautiful train ride from Kandy to Ella through rolling hills laden with tea and timber trees. Chandni reports that she spent a relaxing few days in Galle, lounging on the beach, eating delicious food, and toying with the idea of maybe starting to think about applying for PhD programs.
(More to come on our own travels in subsequent blog posts, but feel free to check out Laura Lutrell’s March 8, 2017 entry, “Time Off in Hill Country,” to learn about a similar trip taken by last year’s crew in the meantime.)
